ModemHelp.Net Ultimate Virus/Trojan/Worm Removal Guide
(For Windows XP)
By: Bradford W. Liedel
Please take note (YOUR OWN RISK): The following steps are performed at your own risk. By following the steps listed on this page you agree to hold no one accountable for following these steps but yourself. ModemHelp.Net will take no responsibility and you agree to not hold ModemHelp.Net or anyone associated with ModemHelp.Net responsible for the information found on this website. You also agree to not hold your ISP responsible for sending you to this website for help with the virus/worm/trojan that you may or may not be infected with. You understand that Internet Service Providers are not responsible for your computer's security. The security of your computer rests only in your hands. By sending you to this website, your Internet Service Provider has gone above and beyond the call of duty and has given you the necessary information and tools for you to remove the virus/trojan/worm from your computer. If this information is unable to remove the infection and your computer remains infected, you should seek professional assistance. You should not be on the Internet while infected except so that you may download software and gather information toward removal of the virus/worm/trojan. To utilize the Internet for anything else, while infected, is irresponsible and can not only lead to the infection of other computers, but may even be allowing hackers/spammers/etc to take control of your computer for the purposes of committing crimes.
Note #2 (DISABLE RESTORATION PROGRAMS): System Restore programs should be turned off/disabled during a virus removal. Information on disabling Window's built-in System Restoration software is included in this article, however your computer may have similar software installed such as Norton Goback. If you have software of this nature installed, it is important to disable this software for the virus/worm/trojan to be properly and fully removed from your system. Please be certain to backup any important data before doing so. Disabling any type of restoration means that if something bad happens during the removal, you will be unable to restore. Unfortunately if you have restoration software active, you will be unable to fully remove the virus/worm/trojan. It is a form of Catch 22, so please be certain to backup your most important data before turning off any type of System Restore.
Note #3 (UNINSTALL OTHER ANTIVIRUS SOFTWARE): If you already have antivirus software installed you may need to uninstall this software before beginning this process. This process is specifically for Avast! Antivirus. The reason I chose Avast! is because it has "Power Through Obscurity". Though it may be disabled by some virii/worms/trojans I am unaware of any that specifically target it, though conversely I am aware of MANY that attack other antivirus software. Due to this, and due to having very good luck with Avast! in the past, I have chosen this Free software as my choice for virus removal.
Note #4 (HOME vs OFFICE): Avast! 4 Home Antivirus by ALWIL Software is absolutely FREE for home non-commercial use. If you are using this software for business/commercial uses, then please download the 60 day trial of Avast! 4 Professional and consider purchasing this software.
STEP 1: Downloading Avast!
The first step is to download Avast! 4 Home (or pro if this is for commercial use). You can download Avast! 4 Home at:
http://www.avast.com/eng/down_home.html
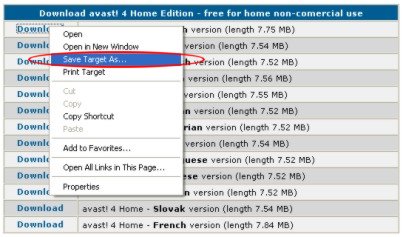
Once you have decided which language version you must download, (see fig. a) right click on the "Download" link next to your language and then left click on "Save Target As...".
(a) ------------------------------ Figure (a) ------------------------------ (a)
(a) ------------------------------ Figure (a) ------------------------------ (a)
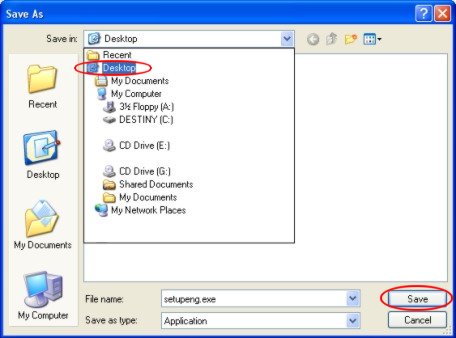
(see fig. b) Left click on the pull-down menu to the right of "Save In" and choose your Desktop. Left click on the "Save" button.
(b) ------------------------------ Figure (b) ------------------------------ (b)
(b) ------------------------------ Figure (b) ------------------------------ (b)
This could take a little bit of time to download depending on your connection speed and how much bandwidth the virus/trojan/worm is stealing from you.
STEP 2: Installing Avast!
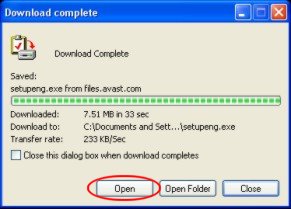
Once the download is complete you can either click the (see fig. c) "Open" button
(c) ------------------------------ Figure (c) ------------------------------ (c)
(c) ------------------------------ Figure (c) ------------------------------ (c)
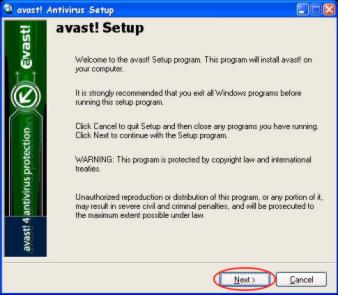
or navigate to your Desktop and double left click on (see fig. d) the Avast! installer file, "setupXXX.exe", where XXX = a 3 character abbreviation for the language you chose, such as "setupeng.exe" for English.
(d) ------------------------------ Figure (d) ------------------------------ (d)
(d) ------------------------------ Figure (d) ------------------------------ (d)
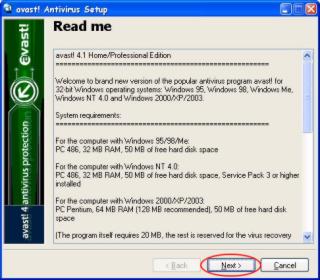
Once the Avast! Antivirus Setup has started click (see fig. e) Next, then
(e) ------------------------------ Figure (e) ------------------------------ (e)
(e) ------------------------------ Figure (e) ------------------------------ (e)
(see fig. f) Next again,
(f) ------------------------------ Figure (f) ------------------------------ (f)
(f) ------------------------------ Figure (f) ------------------------------ (f)
(see fig. g) Select "I Agree" (only if you agree to the terms, otherwise you can abort your installation and the following of these directions), then click Next.
(g) ------------------------------ Figure (g) ------------------------------ (g)

(g) ------------------------------ Figure (g) ------------------------------ (g)
(see fig. h)Most users will keep the default directory (my recommendation) which means all you have to do at this Window is click Next again,
(h) ------------------------------ Figure (h) ------------------------------ (h)
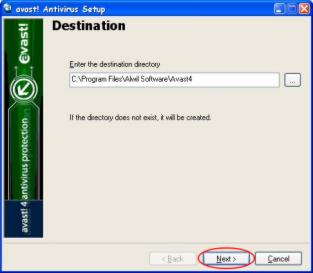
(h) ------------------------------ Figure (h) ------------------------------ (h)
(see fig. i)then select the Installation you wish (I recommend leaving it at Typical), and click Next.
(i) ------------------------------ Figure (i) ------------------------------ (i)
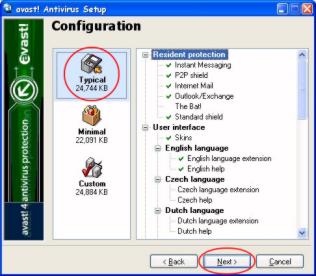
(i) ------------------------------ Figure (i) ------------------------------ (i)
(see fig. j)Click Next.
(j) ------------------------------ Figure (j) ------------------------------ (j)
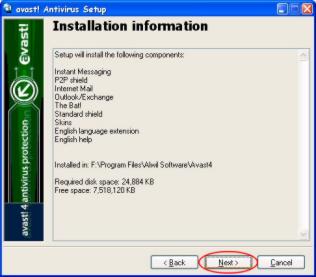
(j) ------------------------------ Figure (j) ------------------------------ (j)
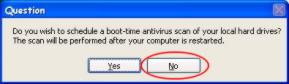
The program will then install. Once it is finished it will ask if you wish to schedule a boot-time antivirus scan of your local hard drives. Though this is an alternative way to scan and remove the virus/worm/trojan you are infected with, I would save this as a last resort. (see fig. k)Click No.
(k) ------------------------------ Figure (k) ------------------------------ (k)
(k) ------------------------------ Figure (k) ------------------------------ (k)
(see fig. l)Now the Avast! Mail Protection Wizard will begin. Click Next.
(l) ------------------------------ Figure (l) ------------------------------ (l)

(l) ------------------------------ Figure (l) ------------------------------ (l)
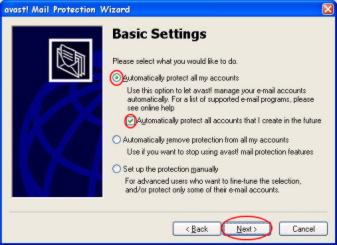
(see fig. m)If you wish your mail protected, click "Automatically protect all my accounts" and check the box "Automatically protect all accounts that I create in the future", then click Next.
(m) ------------------------------ Figure (m) ------------------------------ (m)
(m) ------------------------------ Figure (m) ------------------------------ (m)
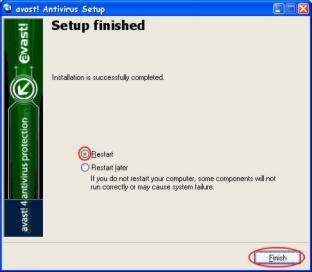
(see fig. n)Check "Restart" and click "Finish".
(n) ------------------------------ Figure (n) ------------------------------ (n)
(n) ------------------------------ Figure (n) ------------------------------ (n)
You have successfully installed Avast! 4 Home.
STEP 3: Updating Avast!
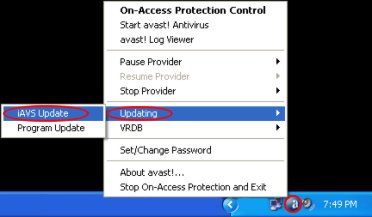
Once your computer has restarted, reconnect to the Internet. You should see an icon of a blue "orb" in your taskbar with a lowercase "a" in it. (see fig. o) Once connected to the Internet, right click on this Avast! icon, move yor mouse over "Updating", and Left click on "iAVS Update".
(o) ------------------------------ Figure (o) ------------------------------ (o)
(o) ------------------------------ Figure (o) ------------------------------ (o)
Once the update is complete you will press "OK" on the completion message and proceed to Step 4.
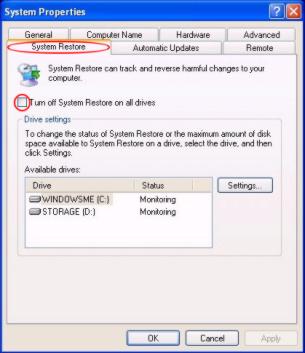
STEP 4: Disabling System Restore
Right click on "My Computer" and Left click on "Properites". (fig smXP_1) Click on the "System Restore" tab and check "Turn off System Restore on all drives".
(srXP_1) ------------------------------ Figure (srXP_1) ------------------------------ (srXP_1)
(srXP_1) ------------------------------ Figure (srXP_1) ------------------------------ (srXP_1)
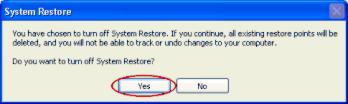
(fig smXP_2) You will then be asked if you are certain. Click the "Yes" button.
(srXP_2) ------------------------------ Figure (srXP_2) ------------------------------ (srXP_2)
(srXP_2) ------------------------------ Figure (srXP_2) ------------------------------ (srXP_2)
Click "OK" and restart Windows.
STEP 5: Entering Safe Mode
Reboot your computer and as it begins to come on, start tapping your F8 key. When you see "Starting Windows XP," continue pressing the F8 key. A menu will appear and you can choose Safe Mode here (you can now stop pressing the F8 key).
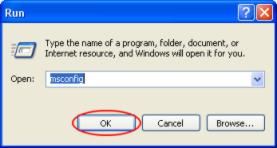
Close all running programs, click Start, Run, and the Run box will appear. (fig smXP_1) Type msconfig and then click the "OK" button.
(smXP_1) ------------------------------ Figure (smXP_1) ------------------------------ (smXP_1)
(smXP_1) ------------------------------ Figure (smXP_1) ------------------------------ (smXP_1)
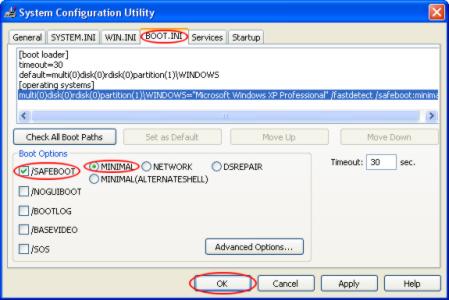
(see fig. smXP_2) In the System Configuration Utility, click the "BOOT.INI" tab. Check "/SAFEBOOT" and "MINIMAL" then press the "OK" button.
(smXP_2) ------------------------------ Figure (smXP_2) ------------------------------ (smXP_2)
(smXP_2) ------------------------------ Figure (smXP_2) ------------------------------ (smXP_2)
(see fig. smXP_3) You will be asked to restart your computer. Click the "Restart" button.
(smXP_3) ------------------------------ Figure (smXP_3) ------------------------------ (smXP_3)

(smXP_3) ------------------------------ Figure (smXP_3) ------------------------------ (smXP_3)
When you finish removing the virus/trojan/worm repeat this step, except uncheck "/SAFEBOOT." You can then close all programs and restart the computer as you would normally.
STEP 6: Running the Avast! 4 Home Thorough Scan
You should have an Avast! icon on your Desktop. (see fig. p) Double left click on this icon. [Note: If any virii/trojans/worms are found, attempt to place them in the Virus Vault, otherwise choose "Delete" then "Delete All" if Avast! is unable to place them in the Vault.]
(p) ------------------------------ Figure (p) ------------------------------ (p)

(p) ------------------------------ Figure (p) ------------------------------ (p)
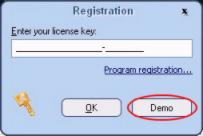
Avast will now scan your memory. (see fig. q) Click the Demo button on the "Registration" Window.
(q) ------------------------------ Figure (q) ------------------------------ (q)
(q) ------------------------------ Figure (q) ------------------------------ (q)
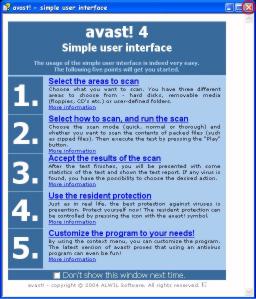
Close the Simple User Interface window (see fig. r) using the "X" in the upper right hand corner.
(r) ------------------------------ Figure (r) ------------------------------ (r)
(r) ------------------------------ Figure (r) ------------------------------ (r)
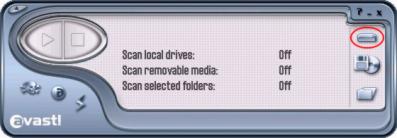
(see fig. s) Click the Hard Drive (Scan Local Disks) icon in the upper right hand corner.
(s) ------------------------------ Figure (s) ------------------------------ (s)
(s) ------------------------------ Figure (s) ------------------------------ (s)
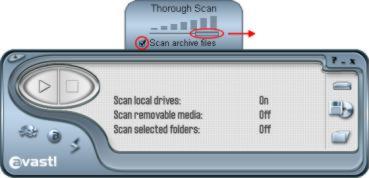
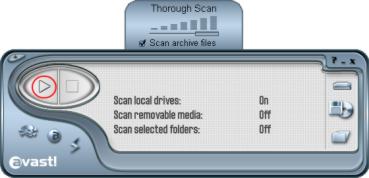
(see fig. t) Move the slider that appears to the right so that "Thorough Scan" is selected and "Scan archive files" is checked.
(t) ------------------------------ Figure (t) ------------------------------ (t)
(t) ------------------------------ Figure (t) ------------------------------ (t)
(see fig. u) Press the "Play" button.
(u) ------------------------------ Figure (u) ------------------------------ (u)
(u) ------------------------------ Figure (u) ------------------------------ (u)
If any virii/trojans/worms are found, attempt to place them in the Virus Vault, otherwise choose "Delete" then "Delete All" if Avast! is unable to place them in the Vault.
STEP 7: Repeat
Repeat steps 5 and 6. Continue repeating these two steps until the scan reports that no virii/worms/trojans have been found.
STEP 8: Run Windows Update
Once you have removed the virus/worm/trojan it will be in your best interest to make certain that you have all of the Critical Updates found on the Microsoft Window's Update website. You can find these updates at: http://windowsupdate.microsoft.com
STEP 9: Reset Computer Back to Normal Operation.
If you utilize System Restore, please see Step 4 for re-enabling System Restore. If you were running 3rd party restoration software, don't forget to re-enable it! Also see Step 5 for turning off the Windows Startup Menu.